amigurumi

amigurumi

Monday, June 6, 2011

Nerd Wars 2!


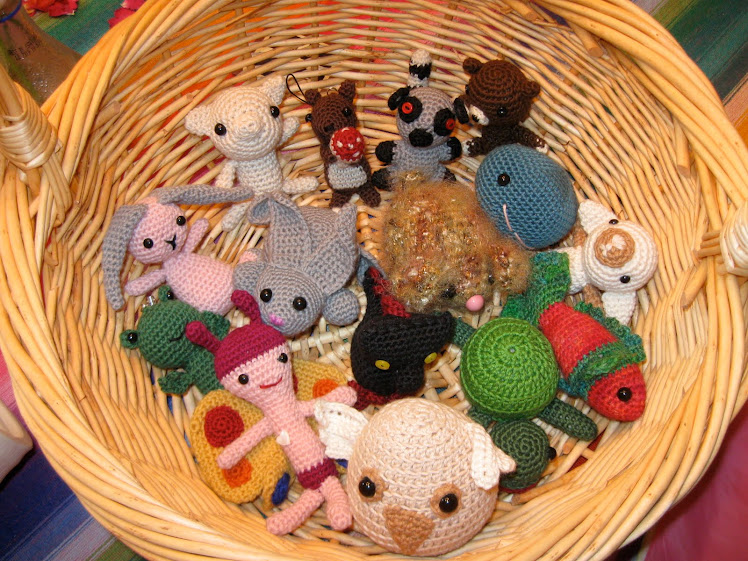
The second round of the Nerd Wars over on Ravelry began on June first & this my first time ever participating in such an event. I have been blogging some of my contributions to the Guild Wars over at Ravelry's Ankh-Morpork Knitter's Guild (such as Nanny Ogg's Best Hat Tea CosyGranny's FrogsMagrat's AmuletsGranny's Shawl, and Perdita's Shawl) & have had a great time dreaming up Discworld-inspired creations. It's really fueled my creativity. One day, while perusing the forums at the A-MKG, I found a link to something called "Nerd Wars". Life hasn't been the same since... I'm lucky to have found the Nerd Wars between rounds because, although you can jump in & participate as  Ninja Warrior, I am having a lot of fun participating as a member of a team.

To rewind a bit, the Nerd Wars is set up as teams of various nerdy fandoms, like Star Wars or Dr. Who, or video games, and then during the 3 months of the Wars you are presented with 6 challenges every month on various topics like "Giving Geeks" (giving to charity) or Science (making something to illustrate a scientific principle). The topics stay the same throughout the Wars, but the specific challenges change every month, & each challenge must be submitted within the calendar month. Still with me?

There's also another category called "Dissertation" where you can propose a challenge for just you to complete that you think will take you 3 whole months to do. These have to be approved by the mods in that thread. All completed projects are scored, with points going to your team. You get extra points if you can theme your projects to your particular team's fandom, which sometimes requires a lot of creative thinking :) The folks over at Nerd Wars are a lot of fun, & although I don't post as much as some on the forums (I get a bit tongue-tied when posting on forums- sounds weird, but it seems to bring out the worst of my aspie-tendencies) I really enjoy reading the forums, especially the Otaku Lounge & the Photo Dominos threads. I really am in awe of the organiser, Eyeamelise. I can't imagine what it took/takes to put together such an amazing event.

The team I was assigned to (I got my first choice!) is Team 4-Panel, which is dedicated to comics & manga. It may seem that the Star Wars team was a more natural choice (& it was my second choice) but I felt that, due to my present immersion in manga & anime in both Japanese & English (see my left sidebar for more info on this :), I thought I'd find more inspiration on Team 4-Panel.

So far, I have submitted (& had approved) a dissertation & also 2 completed projects. I am really excited about all of my projects because I decided, after talking to my friend Momo in Japan, that I would donate the bulk of my Nerd Wars 2 output to the Touhoku earthquake survivors through Knit for Japan, a charity I found on Ravelry.

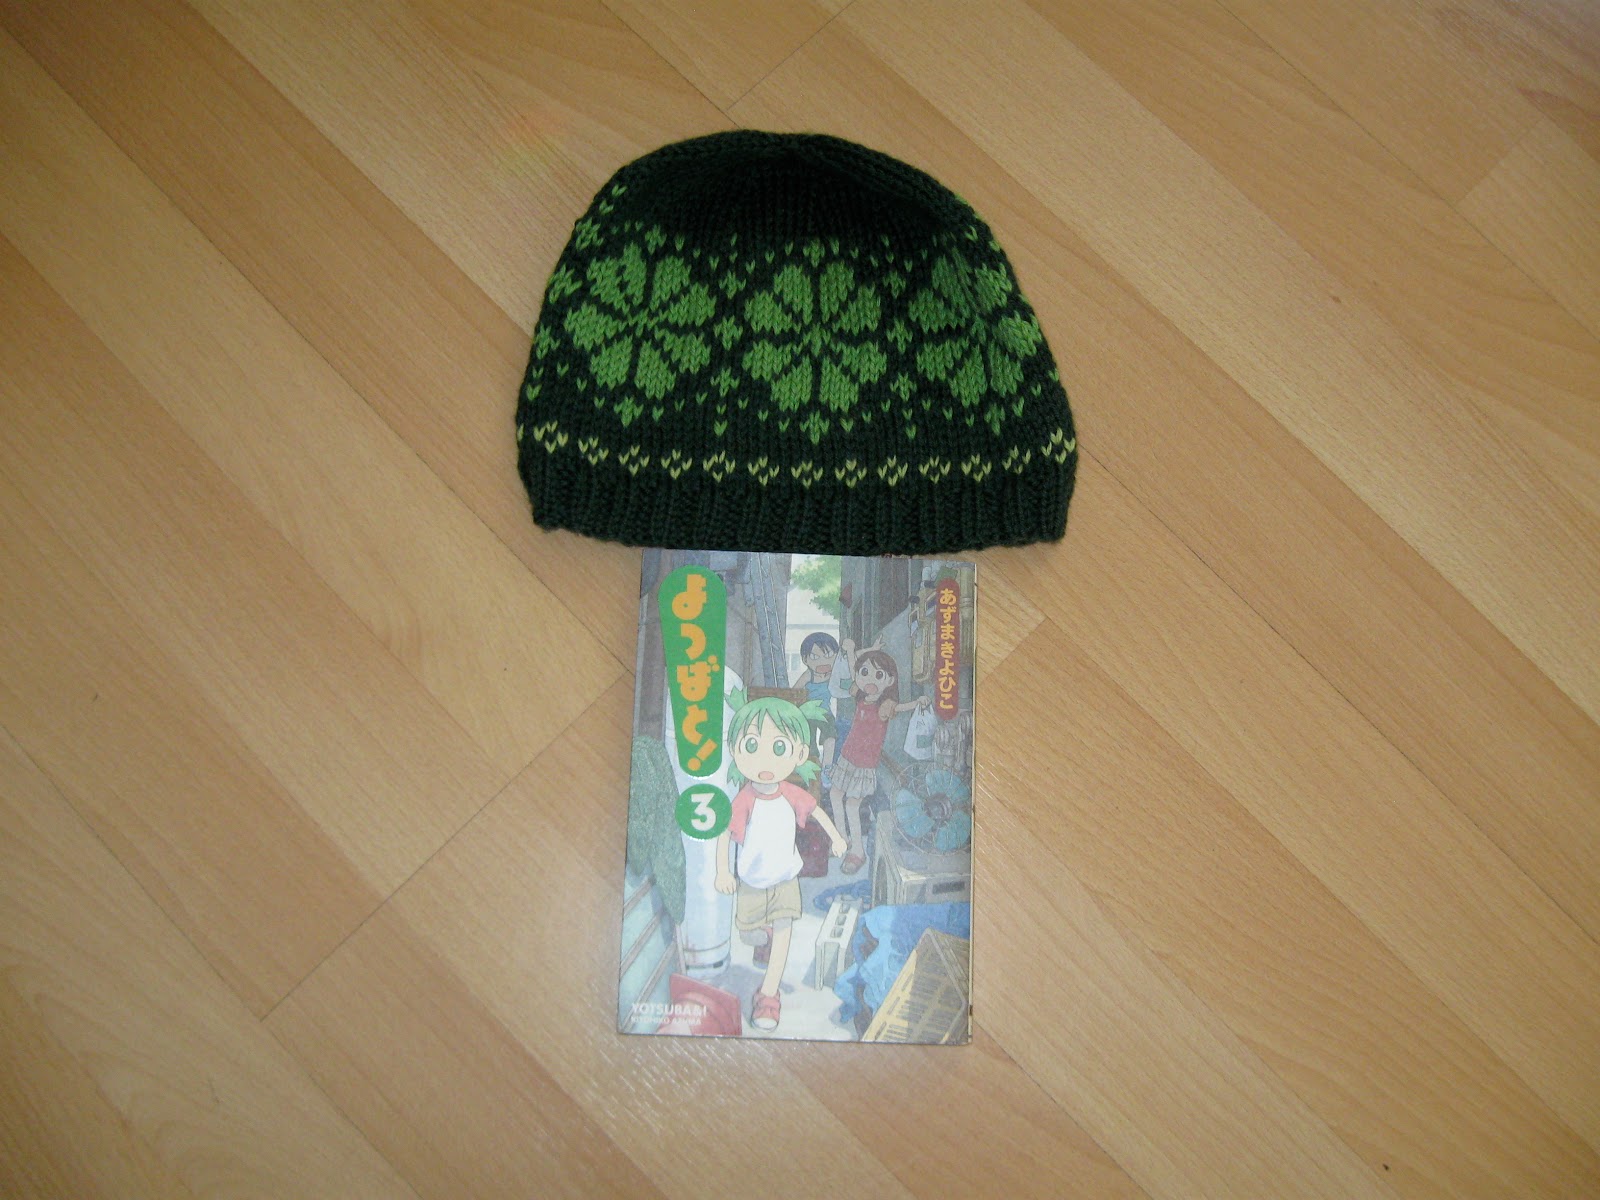
For my dissertation I proposed to knit 14 (one for each week of Nerd Wars 2) children's hats to send to Japan for the earthquake survivors. I will theme all of the hats to various manga. Pictured above is my dissertation swatch, which I'm calling the Yotsuba Hat :) Yotsuba is the name of the manga right below the hat, as well as the little girl on the cover. Her name means "4 leaves" & I picked the colour pattern because it reminded me of Yotsuba's hair (green & in 4 ponytails) & name. I made the hat from KnitPick's Swish DK yarn with size 1 & 2 needles, & my own pattern.

This is my contribution to the "Giving Geeks" category, which this month asks us to contribute an item of baby clothing to a hospital or charity. I made an infant cap & mitts set to send to Japan (the challenge asks us to include the package you'll be sending in the picture). The yarn is shibori-dyed Knitpicks bare sock wool that I dipped in indigo. The knitted-up yarn makes me think of a starry sky, which works beautifully with the manga "Twin Spica", about young people training to be astronauts.

And here is Pikachu, whom I made for the scientific challenge on the topic of lightning. My son wanted me to make a Pikachu, so this little Pokemon will hang around with us as a souvenir of the Nerd Wars :) I used the book you see behind him in the picture, which is from Japan & just full of Pokemon-inspired patterns for kids' clothing & toys. I'll be using it again for my dissertation, I'm sure! The Pikachu I made is a mini version, crocheted with KnitPick's Palette fingering weight yarn & a size c/2/2.75mm hook. The pattern has you make his tail & feet from felt but I crocheted them instead. He really looks like he's going to give you a hug, doesn't he?

I'm looking forward to posting my further adventures in Nerd Wars 2 creations. I've got a Naruto-inspired hat for my dissertation started, & I think there's a pair of child's mittens on board next for one of the challenges. Stay tuned...!

Tuesday, May 31, 2011

Perdita's Shawl

Howdy! Here's yet another recently finished project, which I made for the Ankh-Morpork Knitter's Guild Guild Wars 3. I blogged my other project for GW3 here, my first Rippled Wrap. This here is my second, because I really like this pattern! Plus, I found the perfect yarn for it while up in my attic fibre storage area: it's naturally-dyed, fingering-weight alpaca yarn that I dyed a few years ago. I had been thinking of weaving with it, so I'd purchased some black alpaca of the same weight to use with it. Sadly all of it became moth-eaten :( I was able to reclaim the yarn I'd dyed with not much loss (the black was chewed terribly), and was looking for a project where I could use the multiple, small balls of yarn that I ended-up with. Enter the Ripple! 

I used an I/9/5.50mm hook to get as light a fabric as I could (without it being to loosey-goosey). The alpaca is slightly fuzzy so it has more body than a fingering-weight yarn usually has, but it feels nice on my shoulders (& will feel even nicer when it isn't 80 degrees out!). 
As you can see in the close-up, I decided to edge it on black single-crochet. As mentioned above, the black alpaca fared much worse than my hand-dyed yarn & has sat around looking sad for a long time.
As I was getting close to finishing Perdita I decided I should try to reclaim some of the black for edging, so I put it on the swift & have been hand-unwinding separate strands for a few days now. Just one lump of it was sufficient to finish the shawl, luckily! Who knows how long it may take me to unravel it all from the swift, though...
As you've probably guessed, each stripe was cut at the end of each row & a new colour tied-on. 
It was kind of a pain early on (although it used-up the smaller balls of yarn nicely), but got better as the rows got longer. As it got larger & the ends proliferated, I periodically stopped crocheting & spent some time working the ends in, so that I wouldn't have it all to do at the end. That way, when I was actually done crocheting, there was only about an hour left of weaving ends, then I could do the single crochet along the straight edge (which helps cover up any bumps from tying new colours on...).

And, who is Perdita, you may ask? She's a character in some of Terry Pratchett's Disc World books, of course. She's the main character of Masquerade & becomes one of the Witches that Sir Terry likes to write about. I like to think she'd have worn a shawl of this kind during her brief, dazzling career on the stage!

Saturday, May 28, 2011

Spiral Motif String Bag

Hello! This may look familiar, since I posted a similar string bag a couple of weeks ago, but this one is leaner & meaner (um, not really) & has been written up as my third free pattern posted on Ravelry. Yay!
I'm very pleased to finally get this pattern uploaded because there were some nice comments on the flower motif bag pattern and I wanted to make the spiral one available, too. Since I'd already made a spiral motif bag I thought it might go quickly. But I had to modify the spiral motif (pg. 74 in the Harmony Guide's crochet stitch motifs) because it was a bit too big, so I ended up making another bag & rewriting as I crocheted.

I used KnitPick's CotLin again which is dk weight, using Coffee colour this time, and a size F/5/3.75mm hook. It took just under 2 skeins to make the ~22" long bag. I like how it turned out, & at the rate I'm making string bags, I'm getting a head start on Christmas gifts :) 

Monday, May 23, 2011

Crochet Flower Motif String Bag


I just got done uploading my second pattern over at Ravelry, the Crochet Flower Motif String Bag. I'm really excited about finally getting some of the patterns I've designed available online. Both this one & my first, (the Shell Crochet tea Cozy) are available for free as pdf downloads from Ravelry.

As you can see, it's your basic string bag (about 22" long from handles to bottom) but it has a pretty motif on the bottom. I blogged my first motif-bottom string bag a few weeks ago, & decided to make another one & write the pattern as I went. I used the Harmony Guide- Crochet Stitch Motifs again for the motif, the flower hexagon on pg. 54, which I adapted slightly for the bag. I used KnitPicks CotLin, which is a sport weight, cotton & linen blend, & a size F/5/3.75mm hook. The motif string bag that I made previously was based on a Red Heart company pattern, but this one is my own design because I liked the idea of a simpler top & handles for the bag. It also takes less yarn to make than the Red Heart pattern, but the bag is the same size. Go fig...

I like the way it turned out. I plan to make a pattern for the swirl one from the earlier blog post soon...

Wednesday, May 18, 2011

The Final Tea Cosy is Done!

I am so relieved! I like the way they all turned out, too (whew!). This is the second one made from Noro Silk Garden worsted wool (it's in colour #276). The trivet is motif #57 from Edie Eckman's Beyond the Square- Crochet Motifs. As with the other one, I used a G/6/4.25mm hook & it took just 1 skein to make (with a little left over).
Packing these to send to Japan has worked really well, too, because I can use the box they came in.
I take off the lid & put the cosy back on the tea pot,
fold down the liner & put the lid on it,
add the trivet,
close it up & label it for the recipient! Yay!

A Nerd Wars friend over at Ravelry asked for more specific instructions for making the cozies, so I'm going to try & write it out here.

I used 2 different yarns, KnitPicks Swish DK (123 yds./50 gm) and Noro Silk Garden worsted (100m/50 gm). Because of the difference in the weights of yarn, there are 2 different patterns, so I will put the worsted info in ( ).

This cosy, in either weight of yarn, fits a small, 20 oz tea pot (mine were from Republic of Tea).

Hook size that I used: E/4/3.5mm (G/6/4.24mm).

The cosy begins with a crocheted band that is slip-stitched together into a loop, then the shell stitches are made along the side of the band. This solves the problem of a crocheted cosy not being stretchy enough to fit over the tea pot. Here's what it looks like at the bottom:
To begin, chain 5 (4). Beginning in 2nd chain from hook, single crochet across- 4 (3) sc.
Next row: Single crochet in back loop only across row, chain 1, turn.
Repeat this row until you have 56 (48) rows.
Put foundation chain together with row just finished, making a loop (make sure it's not twisted). Working with foundation chain in front, make a slip-stitch through a foundation chain &  back loop of next stitch to be worked. Continue across row, end with a chain-1, cut yarn with a 6"-8" tail & pull through to fasten-off.

Body of cozy, first side:

Row 1: [RS] Begin where you slip-stitched the band together. Make a sliding loop on hook & sc into hole to left of slip-stitched row if you're right-handed or right of slip-stitch row if you're a lefty. If you look along the band, there is a series of bumps (made of 2 rows of sc). In the first bump, make a 5-double-crochet shell, then single-crochet in the next bump. Repeat this until you have 7 (6) shells, ending with a sc. Chain 3 & turn.

Row 2: [WS] Double-crochet in the same sc as chain-3, single-crochet in the middle stitch of the next shell, *5-dc shell in next sc, sc in middle stitch of next shell* repeat to the end, ending with 2 dc in first sc in row below. Chain 1 & turn.

Row 3: [RS] Sc in first dc, *make shell in sc & sc in middle stitch of shell* repeat  across, ending with a sc. Chain 3 & turn.

Row 4: [WS] Repeat row 2.

Row 5: Repeat row 3.

Row 6: Repeat row 2.

For DK weight yarn, make 2 more rows (8 total), fasten off.

For worsted weight yarn, stop here & fasten off.

Second side of cozy:

Row 1: [WS- shaping is reversed for 2nd side of cozy] Make a sliding loop & fasten yarn with a sc in hole on the other side of the slip-stitch row on the band.

Work the second side as the first, but, as mentioned in row 1, you're starting on the WS & will finish on the RS, which will allow you to keep going when you've finished the second side. In other words, after row 8 (6) do not fasten off.

Top of cosy for DK weight yarn:

Round 1: [always on RS now] Pull up a loop in sc just worked, and another one in first sc on the first side of cosy, bridging the gap, sc these stitches together. *Make a 4-dc shell in each sc, sc in middle stitch of each shell* repeat around (repeat bridging at other side of cosy by pulling a loop up in the top of each ch-3, sc together), end with slip stitch in first sc- 14 shells. Chain 3 & turn.

Round 2:  1 dc in sc, *sc in 2nd dc of 4-dc shell, 3-dc shell in next sc* repeat around to beginning, 1 dc in same sc as ch-3, slip stitch to 3rd chain of ch-3. Chain 1 & turn.

Round 3: Sc in in same place as ch-1. For this row, only the shells will be worked in (this decreases the top). *Make 5-dc shell in middle stitch of next shell, sc in middle stitch of next shell* repeat around, finish with a slip-stich in first sc. Chain 3 & turn.

Round 4: 1 dc in same place, *sc in middle stitch of next shell, 3-dc shell in next sc* repeat around, end with 1 dc in same stitch as ch-3, slip-stitch in 3rd chain of ch-3. Chain 1 & turn.

Round 5: This round also only works in the shells. Sc in same place as ch-1, *work 5-dc shell in middle stitch of next shell, sc in middle stitch of next shell* around, end slip-stitch to first sc. Chain 3 & turn.

Round 6: 2 dc in same stitch as ch-3, *sc in middle stitch of next shell, 5-dc shell in next sc* around. End with 2 dc in same sc as ch-3, slip-stitch to 3rd chain of ch-3. Chain 1 & fasten off. This cozy ends with 4 shells.

Weave all ends. I block the cozies by soaking them in warm water, rolling them in a towel, then placing them on the tea pot & setting on a heating vent to dry.


Top of cosy for worsted weight yarn:

Round 1: [always on RS now] Pull up a loop in sc just worked, and another one in first sc on the first side of cosy, bridging the gap, sc these stitches together. *Make a 3-dc shell in each sc, sc in middle stitch of each shell* repeat around (repeat bridging at other side of cosy by pulling a loop up in the top of each ch-3, sc together), end with slip stitch in first sc- 12 shells. Chain 3 & turn.

Round 2:  1 dc in sc, *sc in middle of shell, 3-dc shell in next sc* repeat around to beginning, 1 dc in same sc as ch-3, slip stitch to 3rd chain of ch-3. Chain 1 & turn.

Round 3: Sc in in same place as ch-1. For this row, only the shells will be worked in (this decreases the top). *Make 5-dc shell in middle stitch of next  shell, sc in middle stitch of next  shell* repeat around, finish with a slip-stich in first sc. Chain 3 & turn.

Round 4: 1 dc in same place, *sc in middle stitch of next shell, 3-dc shell in next sc* repeat around, end with 1 dc in same stitch as ch-3, slip-stitch in 3rd chain of ch-3. Chain 1 & turn.

Round 5: This round also only works in the shells. Sc in same place as ch-1, *work 5-dc shell in middle stitch of next shell, sc in middle stitch of next shell* around, end slip-stitch to first sc. Chain 3 & turn.

Round 6: 2 dc in same stitch as ch-3, *sc in middle stitch of next shell, 5-dc shell in next sc* around. End with 2 dc in same sc as ch-3, slip-stitch to 3rd chain of ch-3. Chain 1 & fasten off. This cozy ends with 3 shell stitches.

Weave all ends. I block the cozies by soaking them in warm water, rolling them in a towel, then placing them on the tea pot & setting on a heating vent to dry.

I hope these instructions are clear. Let me know if they need correcting or explaining.

Tuesday, May 17, 2011

More Tea Cozies

Oh my goodness & Hallelujah! I am nearly done with the tea cosy project. In another post I explained the Tea Cosy Project, but the short & sweet is that I'm making gifts to take to Japan (at the end of June) & hope to send as much as possible (as soon as possible) by mail. Which means that I need to be done with said gifts so I can mail them...

 I hit a wall (which happens a lot when I try to make a bunch of the same thing) which slowed me down a bit. But the latest three are done, along with their matching hot-pads/trivety-things. In fact, the first teapot & cozy are on their way to their recipient, whom we will be meeting in Japan, but lives in the US these days. I thought it would be kinder to send their gifts before they leave for Japan so they won't have to drag them around Japan all summer.
So four are made & the last one is partly done, hooray! I started the project using KnitPicks Swish DK superwash wool in multicolours, & the teal/burnt orange & rainbow ones are in this yarn.Then I hit that wall...
I enjoyed picking out motifs to crochet for the trivets, & that kept me going...
I really like both of these motifs as trivets, as they are dense & cushy & will help retain the heat well. I found all the motifs that I'm using in Edie Beckman's Beyond the Square-Crochet Motifs.

Then I received an order of sale wool from Halcyon & the wall just melted :) I had ordered some Noro Silk Garden on sale in 3 different colourways. Actually, I thought I was ordering the sport weight wool, but it turned out to be the worsted... what to do? The cozies I've crocheted so far are in DK weight... should I try to change the pattern I made for the others...?

That's exactly what I did, basically by picking up a (larger) hook- I used a G/6/4.25mm- and winging it. I ripped a bit but the adaptation came quickly, & being in e heavier weight yarn, the cozy worked-up even faster. yay! The cosy & trivet took just under 1 skein of the yarn (~100 m). Plus, I got to use new, gorgeous yarn almost right out of the box!!
You might be able to see, there are 3 petals around the tea pot knob with the Noro yarn, where there are 4 petals with the DK yarn.
The two sides are slightly different (since I crocheted each side separately & then united them above the handle/spout). But I really like the way they turned out! And only one more to go!!! I really hope that folks like them...

Wednesday, May 11, 2011

"Granny's Shawl"

Hello! Here is my first entry for the Ankh-Morpork Knitter's Guild's Guild Wars 3, challenge 1, over at Ravelry. It's the Rippled Wrap, which is a free download pattern at Ravelry, by Cheri McEwen. I was immediately taken by the photo of this wrap when I was doing a search for crocheted shawl patterns at Ravelry, which showed it made in a rainbow of colours. I decided to make it using Noro Silk Garden sock wool that I had waiting for the right project, because the colours looked just right for this pattern. I used an I/9/5.50 hook to make a drapey fabric, although it's still fairly dense as well. The pattern is all double-crochet, with strategically-placed shells & skipped stitches making the ripples. Once you get the points established (which required careful following of the pattern) it's really easy to do & I enjoyed the process.
I'm thinking of putting a button at the front corner & using the opposite double-crochet loop to fasten it closed in front, which will keep it on very nicely. It's not huge, but the points come below my elbows & it will work very nicely as a wrap.
 I couldn't wait to be finished with this wrap, it was so much fun to make! I started it on May 6th & finished it today. I plan to make another one in some naturally dyed alpaca yarn (a finer yarn, which should give an even drapier fabric) that I found while rooting round in my sewing room today. And then I hit the sale Noro yarns at Halcyon because I could make a bunch of these! For gifts of course!!!